Moving a washing machine, especially a front-load model, can seem like a daunting task. Beyond disconnecting hoses and handling its sheer weight, there’s a critical, often overlooked step that protects your appliance from severe internal damage during transit: installing the shipping bolts. These small but mighty components secure the washer’s delicate drum and suspension system, preventing it from jostling uncontrollably and sustaining costly repairs. Whether you’re relocating across town or to a new home far away, understanding how to properly install these bolts is paramount to ensuring your washing machine arrives safely and ready for its next cycle. This comprehensive guide will walk you through every step, from preparation to post-move setup, guaranteeing your appliance’s longevity and your peace of mind.
Why Shipping Bolts Are Crucial for Your Washing Machine’s Journey
When you first bought your washing machine, it arrived with these protective bolts already in place. Their purpose is simple yet vital: to immobilize the inner drum during transportation. Without them, the drum, which is designed to float freely on springs and shock absorbers for smooth operation, can swing violently, leading to bent frames, damaged bearings, or even a completely dislodged drum.
Protecting Your Investment: The Purpose of Shipping Bolts
|
Our Picks for the Best Front load washing machine in 2026
As an Amazon Associate I earn from qualifying purchases.
|
||
| Num | Product | Action |
|---|---|---|
| 1 | Kenmore 4.5 cu. ft. Front Load Washer with Stain Removing Steam Treatment - Reduce Laundry Time with Accela Wash - LED - ENERGY STAR Certified - Metallic Silver |

|
| 2 | West Bend Washer Compact Front Load Washing Machine with 15 Wash Cycles, LED Display, See-Through Door, Stackable and Space-Saving Design, for Apartments, RVs, and Small Spaces, 2.2 Cu.Ft., White |
|
| 3 | GE PROFILE 28 Inch Smart Front Load Washer with 4.8 cu. ft. Capacity in White GFW550SSNWW |
|
| 4 | BLACK+DECKER 4.5 Cu. Ft. Front Load Washer, Full Size Washing Machine with 12 Cycles, ENERGY STAR certified Washer Machine, Hot & Cold Inlet Hoses, LED Display, 120V, BFLW45M, White |
|
| 5 | Samsung 4.5 cu. ft. High Efficiency Front Load Washer with Vibration Reduction Technology+, White, WF45T6000AW/A5 |
|
| 6 | GE GFW655SPVDS 5.0 cu.ft. Smart Front Load Washer with Steam, UltraFresh Vent System, Black |
|
| 7 | Kenmore 4.5 cu. ft. Top Load Washer with Triple Action Impeller for Tough Dirt & Stains - Reduce Laundry Time with Accela Wash & Express Wash - LED - White |
|
| 8 | Maytag 4.5 cu ft. Front Load Washer with 12-hour Fresh Spin Option |
|
| 9 | LG WM3400CW 4.5 cu ft Front-Load Washer – High-Efficiency, LoDecibel™ Quiet Operation, 6Motion™ Technology, White |
|
| 10 | GE 5.0 cu.ft. Smart Front Load Washer in White with Steam, UltraFresh Vent System, and Microban Technology |
|
Shipping bolts act as a brace, locking the washer’s inner tub against its outer casing. This prevents the tub from moving excessively and impacting other components, such as the motor, hoses, and electrical wiring, during the bumps and shifts of transit. Imagine driving a car with an unsecured engine; the same principle applies to your washing machine’s internal mechanics. The design of front-load washers, with their horizontally rotating drums, makes them particularly vulnerable to damage if transported without these crucial stabilizers. They are engineered to absorb vibrations during wash cycles, not the uncontrolled forces of being loaded onto a moving truck or navigating uneven terrain.
The Risks of Moving Without Them
Ignoring the need for shipping bolts can lead to a cascade of problems. The most common issues include a loud banging or vibrating washer once it’s reinstalled, indicative of a damaged suspension system or misaligned drum. Bearings can wear out prematurely, leading to expensive repairs or even requiring a complete replacement of the appliance. Hoses and internal wiring can become dislodged or severed, causing leaks or electrical faults. In the worst-case scenarios, the entire structure of the washing machine can be compromised, rendering it irreparable. Investing a little time in installing shipping bolts saves significant money and hassle in the long run.
Common Misconceptions About Washer Transport
Many people mistakenly believe that simply securing the washing machine with straps in the moving truck is enough to protect it. While external strapping is important for preventing the appliance from tipping or sliding, it does nothing to prevent the internal drum from moving independently. Others might assume that modern washers are robust enough to withstand movement without special precautions. However, the internal mechanisms of a front-load washer are precisely balanced and highly sensitive to external forces during transport. Always consult your appliance’s manual or manufacturer guidelines, but generally, shipping bolts are a non-negotiable step for safe relocation.
Preparation and Identifying Your Washer’s Shipping Bolt System
Before you can install the shipping bolts, some preliminary steps are necessary to ensure safety and easy access. Gathering the right tools and understanding your specific washer model’s bolt configuration will streamline the process.
Essential Tools You’ll Need
While specific tools might vary slightly by brand, a standard set will typically include:
- Socket Wrench: This is crucial for tightening the bolts securely. The size of the socket will depend on your washer’s bolts, but common sizes include 10mm, 12mm, or 13mm.
- Flathead Screwdriver: Often needed to pry off the plastic caps or plugs that cover the bolt holes.
- Pliers (optional): Can be useful for removing stubborn caps or holding components if necessary.
- Bucket and Towels: For draining residual water from hoses.
- Flashlight: To better see the bolt holes, especially in dimly lit areas.
- The Original Shipping Bolts: If you’ve kept them from the initial installation, now is the time to retrieve them. If not, you’ll need to purchase a replacement kit specific to your washer’s make and model.
Pre-Move Checklist: Power, Water, and Access
Safety first! Before attempting any work on your washing machine, follow these critical preparatory steps:
- Unplug the Washer: Disconnect the power cord from the electrical outlet. This prevents any risk of electrocution or accidental startup.
- Turn Off Water Supply: Locate the hot and cold water supply valves behind your washer and turn them off completely.
- Drain Hoses: Place a bucket behind the washer. Disconnect the hot and cold water inlet hoses from the back of the machine, allowing any residual water to drain into the bucket. Also, ensure the drain hose is emptied. Some washers have a small filter and drain plug at the bottom front that can be opened to fully drain the drum.
- Disconnect Drain Hose: Remove the drain hose from the standpipe or utility sink.
- Secure Hoses and Cords: Bundle the hoses and power cord together with tape or zip ties and secure them to the back of the washer. This prevents them from snagging or being damaged during the move.
- Pull Washer Away from Wall: Gently slide the washer forward to gain full access to its rear panel.
Locating and Understanding Your Washer’s Shipping Bolt Holes
Most front-load washing machines have four shipping bolt holes located on the rear panel. These holes are typically covered by plastic caps or plugs.
- Front-Load Washers: You’ll almost always find these holes on the back of the appliance. They usually correspond to the four corners or are strategically placed around the center to support the tub.
- Top-Load Washers: While less common, some high-efficiency top-load washers with internal suspension systems also require shipping bolts. Check your user manual for specifics.
The bolts themselves often come in different lengths, with shorter bolts usually designed for the top two holes and longer ones for the bottom two. Some brands, however, use bolts of uniform size. Always refer to your washing machine’s user manual for precise instructions and diagrams specific to your model. If you cannot find your manual, a quick online search with your washer’s make and model number will usually yield the information.
Step-by-Step Guide: Installing Washing Machine Shipping Bolts
With your preparation complete and tools at hand, you’re ready to install the shipping bolts. Follow these steps carefully to ensure maximum protection for your appliance.
1. Prepare the Area and Washer
As detailed above, ensure the washer is unplugged, all water is drained, hoses are secured, and you have clear access to the rear of the machine. This foundational step is critical for both safety and efficiency. Clear any obstacles around the washer to give yourself ample space to work.
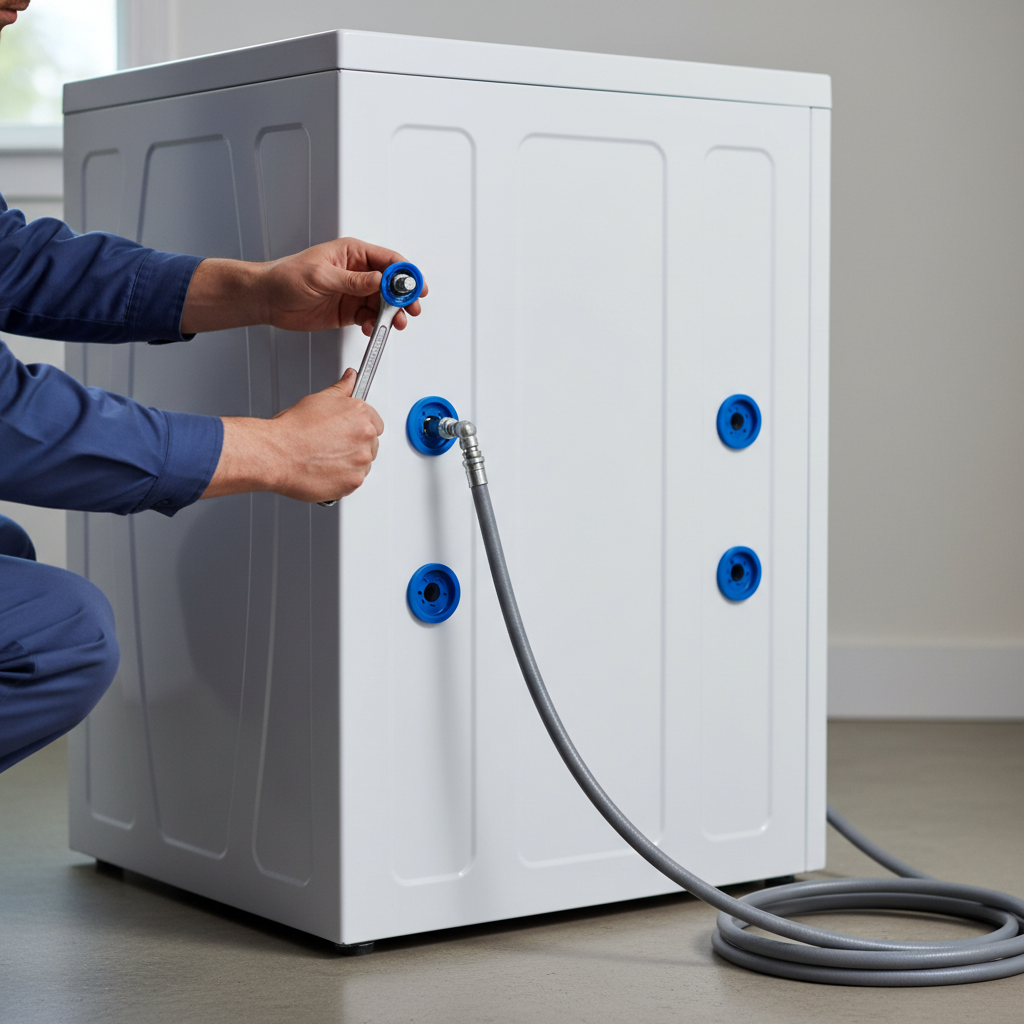
2. Uncover the Bolt Holes
Locate the plastic caps or plugs covering the shipping bolt holes on the rear panel of your washing machine. These are often circular and designed to blend in with the panel. Using a flathead screwdriver, carefully pry off each cap. Work gently to avoid scratching the paint or damaging the panel. If the caps are particularly stubborn, try wiggling them slightly while applying leverage. Once removed, you should see threaded holes or openings where the bolts will be inserted. Keep these plastic caps in a safe place, as you’ll reinsert them once the shipping bolts are removed at your new location.
3. Insert the Shipping Bolts Correctly
Gather your shipping bolts. If they are of different lengths (shorter and longer), identify which ones go where. As a general rule:
- Shorter Bolts: Typically go into the upper two holes.
- Longer Bolts: Usually go into the lower two holes.
- Universal Bolts: If all your bolts are the same length, they can be inserted into any of the four designated holes.
Align each bolt with its corresponding hole. You might need to gently push the washer drum slightly from the front or side to align the internal mechanism with the bolt’s path. Insert the bolt by hand, turning it clockwise until it catches the threads. It should screw in relatively smoothly. If you encounter significant resistance or feel like you’re forcing it, stop immediately. Re-check the alignment and ensure you’re using the correct bolt for that hole. Do not cross-thread the bolt, as this can damage the threading and make it impossible to secure properly.
4. Tighten for Secure Transit
Once all four shipping bolts are hand-tightened, use your socket wrench to fully tighten them. Be firm but avoid over-tightening, which could strip the threads or damage the washer’s frame. The goal is for the bolts to be snug and secure, preventing any movement of the internal drum. You should feel a distinct resistance when the drum is firmly braced. Double-check each bolt to ensure it’s properly seated and tightened. A loose bolt offers little protection during transit.
Troubleshooting Common Installation Hurdles
Even with clear instructions, you might encounter a few snags during the shipping bolt installation process. Here’s how to address some common issues.
| Issue | Potential Cause | Solution |
|---|---|---|
| Lost Shipping Bolts | Bolts discarded after initial installation. | Contact your washer’s manufacturer or an appliance parts store to order a replacement kit specific to your model. Do NOT move without them. |
| Difficulty Finding Holes | Holes covered by stubborn caps or not visible. | Use a flashlight to get a better view. Gently pry off caps with a flathead screwdriver. Consult your owner’s manual for a diagram of their exact location. |
| Bolt Won’t Go In/Tighten | Misalignment of the drum; cross-threading. | Withdraw the bolt and try again, ensuring it’s straight. Gently push or rock the drum slightly to align it internally. Do not force. Ensure you have the correct bolt for the hole. |
| Only Found 3 Holes/Bolts | Some older or smaller models may have fewer; missing one. | Most front-loaders have four. Double-check your manual. If truly only three, install those securely. If one is genuinely missing, acquire a replacement. |
| Bolts Feel Loose After Tightening | Damaged internal threading; incorrect bolt size. | Stop tightening if it feels stripped. This indicates a more serious issue or damage. Consult a professional or use a replacement bolt kit. |
Post-Move: Removing Bolts and Setting Up Your Washer
Once you’ve arrived at your new home and positioned your washing machine, the work isn’t quite done. The shipping bolts must be removed before you can use the appliance.
Safe Removal of Shipping Bolts
Removing the shipping bolts is essentially the reverse of installation.
- Access the Rear: Ensure you have clear access to the back of the washer.
- Loosen and Remove: Using your socket wrench, loosen each bolt by turning counter-clockwise. Once loose, unscrew them by hand and carefully remove them.
- Store Bolts and Reinstall Caps: Store the removed shipping bolts and any associated hardware (like washers or rubber grommets) in a secure, memorable place. Many people tape them inside the washer’s detergent drawer or to the back panel itself for future moves. Reinsert the plastic caps into the bolt holes to protect the internal components from dust and debris, and for aesthetic purposes.
First Wash Checklist: Don’t Forget to Remove Them!
It is absolutely crucial to remove the shipping bolts before running your washing machine. Running a washer with the bolts still installed can cause catastrophic damage to the internal drum, motor, and suspension system, potentially voiding your warranty. The machine will likely vibrate violently, make loud banging noises, and could even move across the floor.
After removing the bolts:
- Reconnect Hoses: Reattach the hot and cold water inlet hoses to the corresponding connections on the back of the washer. Ensure a tight, leak-free seal.
- Connect Drain Hose: Securely place the drain hose into the standpipe or utility sink.
- Plug In: Connect the power cord to a grounded electrical outlet.
- Turn On Water: Open the hot and cold water supply valves fully.
Ensuring Level and Stable Placement
Finally, for optimal performance and to prevent excessive vibration during operation, ensure your washing machine is perfectly level.
- Use a Level: Place a carpenter’s level on top of the washer, checking both front-to-back and side-to-side.
- Adjust Leveling Feet: Most washers have adjustable leveling feet at the bottom. Turn them clockwise to raise a corner and counter-clockwise to lower it. Once level, tighten the lock nuts (if present) to secure the feet in place.
- Check for Rocking: Gently push down on each corner of the washer to ensure it doesn’t rock. If it does, re-adjust the leveling feet until it is completely stable.
Conclusion
Successfully moving a washing machine requires careful planning and execution, and installing shipping bolts is a non-negotiable step to safeguard your appliance. By following the detailed preparation, installation, and post-move procedures outlined in this guide, you can ensure your front-load washer is protected from costly damage during its journey. Taking the time to properly secure the drum not only preserves your investment but also grants you peace of mind that your essential laundry appliance will be ready to perform reliably in its new home. Have you ever experienced issues after moving a washing machine, and what steps did you find most helpful?
Frequently Asked Questions
Can I move my front-load washing machine without shipping bolts?
No, it is highly recommended not to move a front-load washing machine without installing shipping bolts. These bolts are essential to secure the internal drum, preventing it from swinging freely and causing severe damage to the suspension system, motor, and other components during transportation. Ignoring this step can lead to expensive repairs or even render your appliance irreparable.
What should I do if I lost my washing machine’s original shipping bolts?
If you’ve lost your original shipping bolts, you should immediately order a replacement kit. Contact your washing machine’s manufacturer or a reputable appliance parts supplier. You will need your washer’s specific make and model number to ensure you get the correct bolts. Do not attempt to move the washer without them.
How many shipping bolts does a washing machine typically need?
Most front-load washing machines require four shipping bolts. These are usually located on the rear panel of the appliance. Some models might have bolts of different lengths (shorter for the top, longer for the bottom), while others use universal-sized bolts. Always check your washer’s user manual for the exact number and type required for your specific model.
Can I use any bolts as a substitute for official shipping bolts?
No, it is not advisable to use generic bolts as a substitute for official shipping bolts. Genuine shipping bolts are specifically designed to brace the washer’s internal drum correctly and may include specialized washers or rubber components for effective cushioning. Using incorrect bolts could fail to secure the drum properly or even cause damage to the bolt holes.
How do I know if the shipping bolts are properly installed?
Once installed, the shipping bolts should feel snug and secure, firmly bracing the internal drum. You should not be able to visibly move the drum by hand if the bolts are correctly tightened. If the bolts feel loose or the drum still moves significantly, re-check their alignment and ensure they are tightened sufficiently with a socket wrench.
What happens if I forget to remove the shipping bolts before using the washer?
If you forget to remove the shipping bolts before running your Washing Machine, it will likely result in violent shaking, loud banging noises, and potential severe damage to the drum, suspension, and motor. This can lead to costly repairs and may void your appliance’s warranty. Always remove them before connecting water and power for use.